

Last Updated: October 23, 2026
Quick Summary
The best way for beginners to hold a chef knife is the pinch grip: pinch the blade between your thumb and index finger just ahead of the bolster, then wrap your middle, ring, and pinky fingers around the handle. This gives more control, less wrist strain, and cleaner cuts than gripping the handle alone.
- Pinch the blade just ahead of the bolster, with thumb on one flat side and index finger on the other.
- Keep the three lower fingers relaxed around the handle rather than clenched.
- Use the claw grip on your guiding hand, curling fingertips under and pressing knuckles against the blade.
- The handle grip is easier to start with but offers less precision and tires the wrist faster.
- Practice the pinch grip on a stationary knife for a minute a day during week one.
Table of Contents
- Why Your Grip Decides Everything
- The Chef Knife Pinch Grip, Step by Step
- Chef's Knife Finger Placement: Reading the Bolster and Heel
- The Handle Grip: A Valid Starting Point
- The Claw Grip for Cutting: Your Other Hand Matters
- How to Chop Vegetables With a Chef's Knife
- Common Grip Mistakes and How to Fix Them
- Practice Drills and a Beginner Progression
- Frequently Asked Questions
Why Your Grip Decides Everything
The best way to hold a chef knife for beginners is the pinch grip: grip the blade between your thumb and index finger just ahead of the handle, then wrap the remaining three fingers around the handle. That single change gives you more control, less wrist strain, and cleaner cuts than gripping the handle alone.

At GS Custom Knives, we build kitchen blades for people who care how a knife feels in the hand, so we pay close attention to grip.
Serious Eats asked 30 chefs how they hold a knife and found the pinch grip was the most popular and widely taught method, praised for control and a stronger hold.
Below, we break down both grips, walk through the finger placement, and give you drills to build the habit.
The Chef Knife Pinch Grip, Step by Step
The chef knife pinch grip takes about a minute to learn and a week to feel natural. Here is the sequence:
- Lay the knife flat and find the bolster, the thick band where blade meets handle.
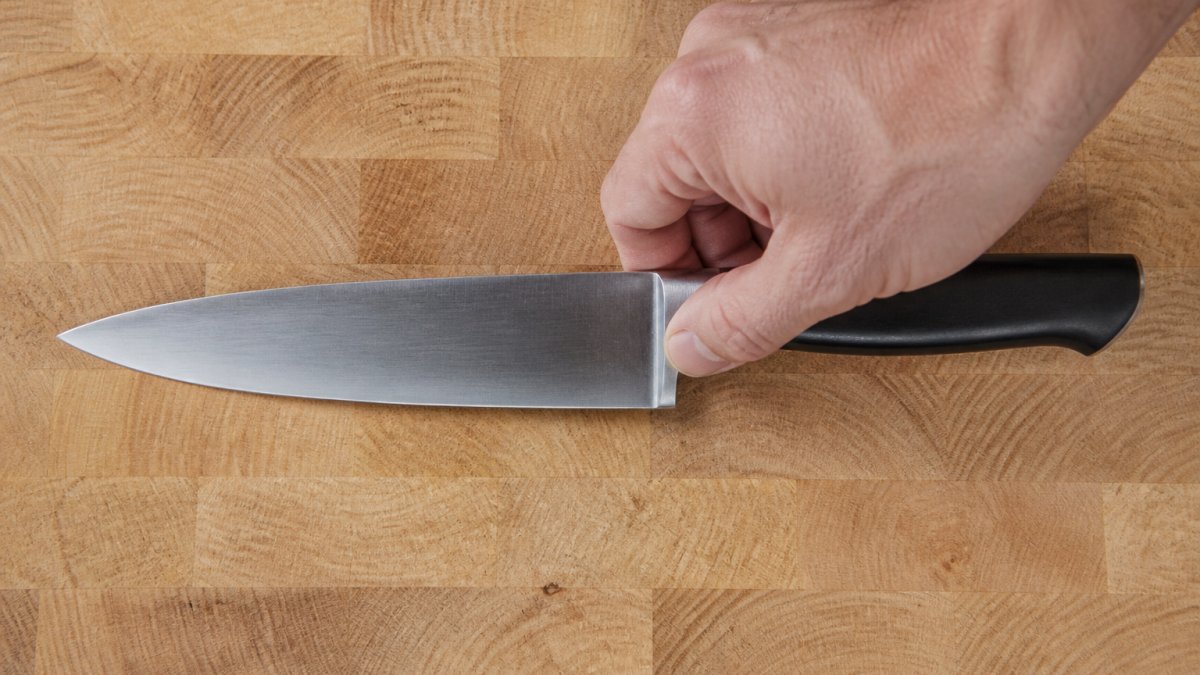
- Pinch the blade just ahead of the bolster with your thumb and index finger.
- Keep your thumb on one flat side, your index finger on the other.
- Wrap your middle, ring, and pinky fingers around the handle.
- Lift the knife and check that the blade sits level, not tipped.
Where the Thumb and Index Finger Go
Your thumb and index finger grip the blade itself, not the handle. Place the thumb on the near side of the blade and the index finger on the far side, both just forward of the bolster.
This is the chef's knife finger placement that gives you real blade control. Your hand now sits closer to the cutting edge, so the knife moves where your fingers point.
The Remaining Three Fingers
The other three fingers wrap around the handle and do the steadying. Keep them relaxed, not clenched. A firm grip on the blade plus a relaxed handle hand is the balance you want.
Chef's Knife Finger Placement: Reading the Bolster and Heel
Grip position matters more than grip strength.
Where you place your hand changes how the knife balances. Choke up too far onto the blade and the knife feels nose-heavy. Slide back onto the handle and you lose precision.
Consumer Reports tests 8-inch chef's knives from brands like Henckels, Mac, and Wüsthof, and it stresses testing for balance and performance. Balance is exactly what your grip controls.
One Grip Does Not Fit Every Hand or Knife
Most guides show a single photo and call it done.
Hand size. A small hand on a wide blade may need to pinch slightly further forward, closer to the heel, so the fingers can wrap without crowding.
Blade height. Tall blades (common on Japanese-style chef's knives) give more flat steel to pinch and more knuckle clearance above the board.
Bolster design. A full, thick bolster creates a physical wall your fingers rest against, which makes the pinch point easy to find.
Handle shape. A round or oval handle lets your three lower fingers wrap naturally. A squared or oversized handle can push your hand back, which pulls the pinch point away from the blade. If the handle feels bulky, you will unconsciously grip further back, a common reason beginners lose control without realizing why.
Reading the Heel and the Balance Point
The heel does the heavy work in a rock chop, so your pinch point should sit close enough that you can feel the heel's weight. A quick check: balance the knife on one finger at the point where the blade meets the handle. That balance point tells you where the knife wants to pivot. Pinching just ahead of it gives you the most leverage with the least wrist effort.
A Quick Fit Check
Run through this before your first cut:
- Pinch ahead of the bolster and confirm your thumb and index finger sit flat on the blade's sides.
- Check that your middle, ring, and pinky fingers wrap the handle without your hand sliding back.
- Rock the knife gently and confirm the blade stays level.
- If your knuckles hit the board, try a taller blade or shift the pinch point slightly forward.
If the knife fails two or more of these checks, the grip is not the problem, the knife's size or shape is fighting your hand.
The Handle Grip: A Valid Starting Point
The handle grip means wrapping all five fingers around the handle, with no fingers on the blade. It is the most intuitive position for a total beginner, and that counts for something.
Bon Appétit notes some beginners find the handle grip most natural, even though the pinch grip is standard for control. We agree with the honesty of that.
The trade-off is real. The handle grip gives you less use and less precision. It also tires your wrist faster during long prep sessions.
Pinch Grip vs. Handle Grip: When to Use Each
Most beginner guides present one grip as correct and leave it there. That is where readers get stuck, because the honest answer is that the two grips solve different problems. Here is a practical comparison you can act on.
| Situation | Pinch Grip | Handle Grip |
|---|---|---|
| First week with a knife | Harder to learn, better long-term habit | Easier to start, slower to outgrow |
| Precision work (brunoise, fine dice, shallots) | Clearly better, the blade follows your fingers | Noticeably less accurate |
| Heavy chopping (squash, root vegetables) | Better control and less wrist strain | More tiring, more likely to wander |
| Long prep sessions | Less fatigue once learned | Wrist tires faster |
| Very small hands on a large knife | Can feel crowded near the bolster | May feel more secure at first |
| Knife with a thick, pronounced bolster | Pinch point sits ahead of the bolster; check clearance | Handle may be the only comfortable option |
A simple rule: use the pinch grip for anything where the cut matters, and treat the handle grip as training wheels.
When the Handle Grip Is the Right Call
There are legitimate cases where the handle grip is not a compromise:
- Very large knives on a small hand. A 10-inch chef's knife with a thick handle can leave no comfortable room to pinch ahead of the bolster. The handle grip may be the safer choice until you move to a smaller blade.
- Heavy cleavers and specialty blades. Some blades are balanced for a full-hand grip, and forcing a pinch can feel unstable.
- Recovery from hand or wrist injury. If pinching aggravates a joint, a relaxed handle grip keeps you cooking while you rebuild strength.
If you find yourself defaulting to the handle grip on every task after a few weeks, that is the signal to practice the pinch grip on soft foods until it feels normal.
The Claw Grip for Cutting: Your Other Hand Matters
The claw grip for cutting is how you hold the food, not the knife. Curl your fingertips under and press your knuckles against the blade's flat side. Your knuckles become the guide, and your fingertips stay out of the edge's path.
This is the single biggest safety habit in knife handling. The blade rides against your knuckles, so it never reaches your fingertips.
- Tuck your thumb behind your fingers, out of the way.
- Keep your guiding hand moving back as you cut.
- Let the knife's flat side rest lightly against your knuckles.
How to Chop Vegetables With a Chef's Knife
Learning how to chop vegetables with a chef's knife starts with setup, not speed. Place a damp towel under your cutting board so it does not slide. Grip the knife in the pinch grip and set your guiding hand in the claw.
Then use the three motions that do most of the work:
- The rock chop: keep the tip on the board and rock the heel up and down for herbs and garlic.
- The push cut: drive the blade forward and down for onions and carrots.
- The walk: let the blade travel in a small arc while your guiding hand feeds the food.
Keep your wrist straight and let your forearm do the work. Speed comes last, after the motion feels boring.
Common Grip Mistakes and How to Fix Them
Most beginner problems trace back to one of these:
| Mistake | What It Causes | The Fix |
|---|---|---|
| Gripping only the handle | Less control, tired wrist | Move the pinch onto the blade |
| White-knuckle grip | Hand fatigue, jerky cuts | Firm on the blade, relaxed on the handle |
| Index finger on the spine | Poor steering | Pinch the blade's flat side instead |
| Flat guiding hand | Risk of a cut | Curl into the claw grip |
| Hand too far back | Nose-heavy, unstable knife | Choke up toward the bolster |
A dull edge causes more than bad cuts. It makes you press harder, which pushes your grip out of position. Keep the edge sharp and the grip takes care of itself.
Practice Drills and a Beginner Progression
Build the habit in stages, not all at once:
- Week one: hold the pinch grip on a stationary knife for a minute a day. No cutting.
- Week two: rock chop soft foods like mushrooms and herbs.
- Week three: practice the claw grip on onions and celery.
- Week four: combine both grips on a full meal prep.
For hands that fatigue or grip differently, a knife with a handle shaped to your hand changes the whole experience. Our Gyuto Chef Blade is built from 1.4116 stainless steel with a full tang and a full flat ground edge, and it runs $150.00. The Custom Damascus Chef Knife is hand forged from 512 layers of 1095 and 15N20 high carbon steel at $145.00. Both are shaped to sit naturally under a proper pinch grip, and every GS Custom Knives blade carries a lifetime satisfaction guarantee.

Frequently Asked Questions
How should I hold a chef's knife correctly?
Pinch the blade between your thumb and index finger just ahead of the bolster, then wrap your remaining three fingers around the handle. This is the pinch grip, and it is the most widely taught method. Serious Eats reported in 2024 that 30 chefs surveyed named it their preferred grip because it gives a stronger hold and better control than wrapping all five fingers around the handle. Keep your wrist relaxed and let the knife's weight do the work.
What is the pinch grip on a chef's knife?
The pinch grip means gripping the blade itself, not the handle. Your thumb and index finger pinch the flat sides of the blade right where it meets the bolster, and the other three fingers curl around the handle. It feels awkward for the first week, but it puts your hand closer to the cutting edge, which improves blade control and stability. Most beginners adapt within a few practice sessions.
Where should your fingers go when holding a chef's knife?
For chef's knife finger placement, the thumb and index finger pinch the blade just ahead of the bolster, with the thumb on one side and the index finger on the other. The middle, ring, and pinky fingers wrap around the handle. Never let your index finger rest on the spine of the blade, that position reduces control and tires your hand quickly. Keep the grip firm but relaxed.
Should your index finger rest on the spine of a chef's knife?
No. Resting your index finger on the spine is a common beginner habit, but it moves your hand away from the blade and weakens your control. The pinch grip keeps the index finger on the side of the blade instead, close to the heel. That position gives you more precision and less wrist strain. If you catch yourself on the spine, slide the finger down onto the blade face.
How can beginners hold a chef's knife safely?
Use the pinch grip on your dominant hand and the claw grip for cutting on your food-holding hand. Curl your fingertips under so your knuckles guide the blade, and keep the blade tip on the board between cuts. A sharp knife is safer than a dull one because it does not slip. Practice with soft vegetables like zucchini before moving to onions and carrots.
Your grip is the one part of knife work you control completely, and it is the part most beginners never fix. A balanced, well-made blade makes that grip easier to hold. At GS Custom Knives, we handcraft each knife to your hand with custom blade shapes, personalized handles, and superior steel, all backed by our lifetime satisfaction guarantee. Get started with GS Custom Knives and build a grip that finally feels right.
